16 bit Images for Medium Dynamic Range
JD Smith
Traditionally, 16 bit imaging has been employed with source images of limited dynamic range to increase color and intensity sampling density, primarily to avoid artifacts like banding and posterization which may occur in strong processing. These effects are most readily seen by stretching contrast in smooth areas, like blue skies - see e.g. this article for some demonstrations. However, the degree to which a full 16 bit workflow is required to avoid banding artifacts is widely debated. Many common image editing and compositing tools work directly with 16 bit images.
Though not its traditional use, a 16 bit image format could also in principle be used to hold image data captured over a larger range of physical light intensity, without substantially increasing the sampling density over lower range images. In particular, since most digital cameras which can output RAW file formats utilize 12 bit analog-to-digital converters, and since these cameras also make it easy to shoot a set of 3 bracketed exposures separated by 2 stops (at -2,0,2EV), it is interesting to think of shoehorning the full available range of 3 RAW images, shot in a bracketed series over a factor of 16 in shutter speed, into a single 16 bit image. Such an image, which might contain at most 10-14 stops of available dynamic range, is dubbed a Medium Dynamic Range (MDR) image. It cannot accommodate the full dynamic range available in common outdoor scenes (up to 17 stops, see this article), but it could provide a useful and easily accessible extension of available range in certain types of photography.
A required assumption implicit in this method is the linearity of the CCD and CMOS detectors used in digital cameras. This issue is explored in the context of the example images presented below here. It should also be pointed out that the vast majority of 16 bit workflows offer no additional dynamic range over their 8 bit counterparts, instead just providing protection against numerical artifacts which result from insufficient sampling. To actually achieve larger dynamic range in an MDR 16 bit image, you must
- Have a scene with large enough intrinsic dynamic range (ratio of brightest to darkest intensity) to be of interest.
- Capture expanded dynamic range within the scene by bracketing exposures (which requires an unmoving camera).
You may be able to obtain expanded range directly from single RAW files, but that application is not pursued here.
Advantages
Why would you want to do this?- 16 bit images are well supported by editing applications like Cinepaint, Photoshop, etc.
- The potential dynamic range available in 16 bit images, stored with good sampling, is nicely matched to the range available in 3 bracketed 12bit RAW images spanning 4 stops of exposure. Such brackets sets are easily produced by many modern digital cameras.
- A single 16 bit TIFF takes up less disk space than 3 TIFFs converted from RAW.
- Operations on a single 16 bit TIFF image are much faster than on the set of 3 TIFFs or RAWs needed for bracketing.
- Many panoramic image applications can work directly with 16 bit images (e.g. Hugin). Panoramic workflows are simplified, since there is only one image set to stitch.
- Almost all image viewers can display 16 bit images.
- The procedure for producing an MDR 16 bit image is entirely automated; no hand-tuning required.
- You can tonemap directly from MDR 16 bit images and recover the full dynamic range available in 3 RAW images (see below).
- By averaging data in the valid range of overlap between bracketed exposures, noise is reduced at some levels (though not at the lowest levels, in the bottom ~2 stops).
Disadvantages
Why wouldn't you want to do this?
- 16 bit images are not capable of holding true high dynamic range imaging data while retaining good sampling. Other, newer imaging formats are far more capable for this purpose (see Greg Ward's article on the subject). Examples where the range available in a 16 bit image would be insufficient include very dark interiors with a bright outside view through a window, and many computer generated imaging applications.
- One of the classical (though debated) advantages of 16 bit imaging is lost: since you are now sampling a much larger range of physical light intensity, the sampling density (aka how many numbers are allotted to represent a given change in light intensity) may not be sufficient to prevent banding, etc. In practice this is no worse and usually slightly better than individual 8bit LDR images.
- A single 16 bit TIFF images still takes a moderately large amount of disk space (similar to some of the HDR formats). 16 bit PNG or JPEG-2000 can help reduce the space requirements, and an MDR 16 bit image file certainly takes less space than three 16 bit TIFFs, one from each RAW file.
- Like HDR imaging techniques, MDR imaging is not easily color-calibrated (though people are working on it).
- Since MDR 16 bit images contain higher dynamic range than can be displayed on monitors or printed, they can appear flat without tonemapping or other tone manipulation.
- Unlike exposure blending or other techniques to combine multiple bracketed exposures, you have no control over elements which moved during the bracket series, so the method is not as useful for rapidly changing scenes.
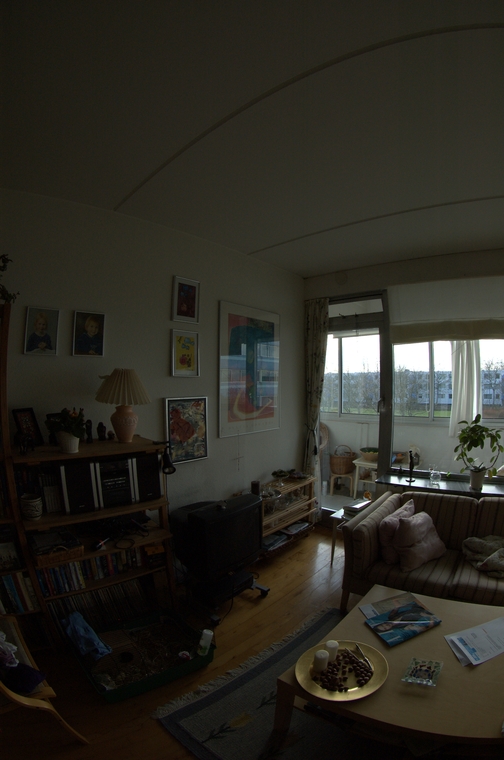
An Example 16 bit MDR image
This example builds on the RAW comparison performed by Flemming Larson, using his set of 3 bracketed RAW exposures in the Nikon's NEF format, from a D70. Shown below are a variety of images derived from these 3 RAW files, including each one individually, tonemapped versions of the normally exposed image, of an HDR created directly from all 3 RAW files, as well as the MDR 16 bit image described here.Mouse over the image name in the menu bar below to see the full image, and three full size crops.
 |
 |
 | |
 |
All RAW NEF images are converted with Dave Coffin's DCRAW v8.54, using (for the Dark, Normal, and Bright images):
% dcraw -T -w file.nef
The 16 bit MDR TIFF was created by combining the dcraw linear output from all 3 files as described below.
Tonemapped images were created with Photomatix v2.3.3, using these setting (Photomatix set file), and as follows:
- Normal (Toned)
- By tonemapping directly from the normally exposed (0EV) RAW NEF file.
- Bracket HDR (Toned)
- By assembling all 3 bracketed RAW images (-2EV,0EV,2EV) into an HDR image, then tonemapping this image.
- MDR 16 bit
- By tonemapping directly from a single MDR 16 bit TIFF file (assembled as described below).
Thoughts
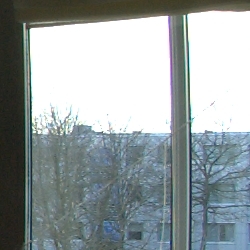
It's quite clear that three bracketed RAW images expand the available dynamic range over a single RAW exposure. While this scene has few regions with strong shadows, comparing the tonemapped dark RAW with the tonemapped HDR created from all 3 RAW images shows this clearly. There is strong additional detail in the trees out the window, and in the dark shadow regions. Yes, bracketing is useful. Had this scene had more dark shadow regions, or had the exposure been shifted downwards to better accommodate the window view, this difference would have been even more pronounced.Comparing the last two images, it's also evident that the 16 bit MDR image created contains a very similar amount of detail at both ends of the intensity scale as the full HDR created from 3 bracketed RAW exposures (leaving aside issues of white balance and overall tone). To give an idea what the range is, the tops of the trees out the window have (linear) luminance values ~60,000, whereas the black book in the middle crop has a linear luminance value of ~15, and is not yet dominated by noise. This gives a very rough real world dynamic range of ~4000 (cf. roughly 1000 in a single RAW image), or about 12 stops. The actual number may be slightly higher than this, but this is a reasonable estimate.
How did I do it?
Creating the MDR 16 bit image was straightforward:- Use dcraw to
extract linear 16 bit data from each of the three RAW files.
Note that the linear output of dcraw is proportional to the true light
intensity at that position (see my notes on the
linearity of the DSLR detectors). The command called was:
% dcraw -4 -w -T file.nef
- Mark pixels to exclude from each of the three linear TIFF images
as follows:
- Dark image pixels below a lower cutoff were excluded.
- Normal image pixels above an upper or below a lower cutoff were excluded.
- Bright image pixels above an upper cutoff were excluded.
- If a pixel is excluded in any color channel, it is excluded in all color channels.
- If a given pixel was excluded from all three images, the exclusion is lifted for all three images.
- The upper and lower cutoffs used were the same for all 3 images, and all three colors (see this page on linearity). In this case, I used cutoffs of [1000,60000].
- Shift the bright image down by dividing by a factor of 16, and the normal image down by a factor of 4 (in these 12bit RAWs, the first 4 bits contain no useful detail, only interpolator artifacts).
- Average the remaining (non-excluded) pixels at each position and in each color channel.
- (Optionally) gamma-correct the image (I used gamma=2.2 in the above example).
- Write out a 16-bit TIFF file, packed to the brim with usable dynamic range.
An IDL routine which implements this algorithm is provided: merg16.pro. Equivalent C routines are being investigated.
Note that aside from dcraw's native white balance setting, which it performs based on the camera's measured white balance stored in the NEF file, no other color corrections were performed. Since ICC profile color spaces are tailored to low dynamic range, color managed workflow isn't truly possible here (except after tonemapping or range compression). The same limitation is true for all the various HDR applications (e.g. Photomatix).
Download
You can download this example 16bit MDR image, encoded as TIFF, and gzip-compressed:mdr16.tiff.gz [30MB]
This is a bare-bones TIFF image without much header material, and with no attempt made to correct white balance (above dcraw's efforts). Comments welcome.
 Last modified: Mon Feb 19 13:36:44 MST 2007