Contrast Blending with the Gimp
 +
+
 +
+
 =
=

exposure-blend: A GIMP plug-in for contrast blending 3 bracketed images.
Download:
- exposure-blend (Gimp v2.6-v2.10)
- exposure-blend (Gimp v2.3-2.5) with thanks to Alan Stewart.
- exposure-blend (Gimp v2.2)
The Problem
Many typical photographic scenes contain far more dynamic range than modern digital cameras can record in a single exposure. Digital cameras are actually slightly worse in this respect than film cameras, since they are very unforgiving to the slightest over-exposure.Bracketing Techniques
To help overcome this limitation, you can bracket the shot using multiple exposures. Many digital cameras offer bracketing modes, in which (typically) 3 exposures can be taken in succession varying only the exposure, in fixed stop increments (e.g. 2EV). See examples below. A variety of tools and techniques for using a set of such exposures from a single scene to recover higher dynamic range has appeared in recent years, ranging from simple and cheap, to expensive and time-consuming (see the PanoramaTools WIKI for more). Images can be merged to recover with high precision the true luminance in the scene (a techniques called high dynamic range --- HDR imaging). However, such HDR images must then be compressed down again to the limited dynamic range available in print and display devices (1000:1 or less).A simpler method is available in contrast blending in which image data from multiple exposures are linearly combined to recover shadows and highlights. Popular methods for contrast blending include manually (see this article), using special Photoshop actions, or using the PhotoMatix program.
I wanted an easy to use but flexible tool which works with the GIMP, a free and powerful image manipulation program -- hence exposure-blend. A powerful method for blending three bracketed exposures using contrast blending and the Gimp is given by Daniel Schwen. exposure-blend is a Gimp script-fu plug-in which expands this technique, automates many parts of it, and provides several additional useful features.
exposure-blend is similar in spirit (though different in technique) to Erik Krause's Contrast Blending PhotoShop Actions. See also Ed Halley's Blending Exposure Tutorial for the GIMP.
Another more recent and very powerful automatic exposure blending free software tool is enfuse, from the maker of enblend.
Background
Contrast blending is the simple linear combination of 2 or more images taken with differing exposure, with linear weighting coefficients which vary across the scene. In dark parts of the scene, the over-exposed image should receive the most weight, whereas in bright parts of the scene, the under-exposed image should.You can manually set the weighting by hand (often easy enough, e.g. for an interior with a single window), but here this is implemented by using layer masks -- grayscale images which set the opacity of each pixel in a given layer -- drawn the from the image data themselves. By layering the three exposures with appropriate layer masks, we can obtain essentially any combination of weights in different parts of the image.
By default, exposure-blend orders the exposures as bright, dark, normal, and uses a grayscale copy of the dark image itself as the mask for the underexposed imaged, and an inverted copy of the bright image as its own mask. A given pixel value in the resulting stack is dictated by the opacity of each layer, from top to bottom. If, for a given pixel the top layer "uses up" 50% of the opacity, and next layer uses 40%, only 10% remains for the bottom layer; the final image will then consist of 50% top (bright) + 40% middle (dark) + 10% bottom (normal). The trick is setting up these opacity values in a useful way. Using the dark image as its own mask gives it very little weight where the scene is dark, and more weight where the scene is brightest. Conversely, giving the bright layer its inverse as a mask gives it the most weight where the scene is darkest. Everything which is not covered by one of these two is "caught" by the normally exposed image in the bottom layer.
The key point to remember is the brighter the mask value, the larger the weight given to the image in that layer. The ordering of the image layers also has some impact on the result, since if the top layer requests 70% of the weight, and the 2nd layer requests 50%, it is limited to 30% opacity. Switch the order of the two layers, and each would recieve 50%. For typical scenes this is not a big effect, but you can experiment to see which ordering gives better results.
The mask images are smoothed to prevent sharp transitions between pixels from one image to those of another, and to avoid aliasing if the image alignment isn't perfect. The larger the smooth radius, the less likely are such abrupt transition edges, but the more likely are "halos" and a general washed out appearance. Smoothing with "edge-protection" is also available.
Other options are of course possible (e.g. using the normal image as the dark's mask, etc.), and editing the masks directly gives you very powerful control over the relative weighting of dark, bright, and normal exposures in different parts of the image.
Features
exposure-blend makes quick work of blending 3 bracketed exposures into a detailed, realistic, extended contrast image. It has many features to save you the drudgery of assembling contrast blended stacks yourself:- Set masks from among any of the three images (normal, dark, bright).
- Several smoothing options, including edge protection for halo suppression.
- Stores smoothed versions of all masks used for quick automatic recovery, so you can feel free to experiment with different versions, quickly switching among the mask source and smoothing choices. These are saved along with the file, so you can pick up where you left off.
- Optionally pre-trim the masks' histograms to deliver good contrast.
- Differencing alignment mode to enable easy manual alignment of the images. This also moves all the associated cached mask to keep things in sync.
- Trim the image to the area of overlap of all three layers.
- Save custom edited image masks for later recovery.
- Similar "mostly-automatic" mode produces reasonable results (see example below).
- Infinitely tweakable final image, with good real-time feedback.
- Easily change the blend weights in certain regions of the image by directly editing the masks.
Shooting
exposure-blend works on 3 images at a time, one normally exposed (normal), one under-exposed (dark), and one over-exposed (bright). Locate and read up on your camera's bracketing options. Three shots stepped by 2EV works very well in many situations (and is often the maximum range). This corresponds to a factor of 16 in exposure time between the shortest and longest exposure.Use a tripod to ensure very little movement occurs between shots (you can align images which were nudged slightly using the tool). Use a cable release or remote control if possible to avoid disturbing the camera. Ideally, make sure the bracketing only adjusts exposure time and not aperture, so depth of focus will be similar (less critical for distant landscape shots).
Installation
First install the GIMP, at least version 2.2. After running it once, download and add the script file exposure-blend.scm to the directory ~/.gimp-2.6/scripts (or the corresponding version number; users of a Gimp package on OSX may need to install in Library/Application Support/Gimp/scripts/).Restart the GIMP, and you should find Filter->Exposure Blend, with several tasks beneath. For earlier versions of Gimp, some items may appear as Xtns->Script Fu in the toolbox menu.
Main Dialog
The main dialog for building a blended exposure is available from: Filter->Exposure Blend->Blend... (earlier versions versions Filters->Photo->Exposure Blend... or Xtns->Script Fu->Photo).Loading images
Options
The initial options are:- Normal Exposure:
- The normally exposed images (often the first or last in the series).
- Short Exposure (Dark):
- The under-exposed, dark image.
- Long Exposure (Bright):
- The over-exposed, bright image.
- Blend Mask Blur Radius:
- The radius in pixels of the gaussian blur to apply to the layer masks.
- Blur Type/Edge Protection
- Whether to use normal Gaussian, or "selective" Gaussian blurring (which protects edges from being smoothed smoothed), and the level of edge protection desired.
- Dark Mask Grayscale:
- Which image to use as the layer mask for the dark image.
- Bright Mask Grayscale:
- Which image to use the inverse of as the layer mask for the bright image.
- Dark Takes Precedence:
- Put the dark layer on top (can be done by hand trivially).
- Auto-Trim Mask Histograms
- Trim the black and white levels of the mask histograms so they occupy the full range of values 0-255, with some trimming of the ends of the histogram. Same as clicking "Auto" in the Levels tool for both masks.
- Scale Largest Image Dimension to:
- Scale down images to be no larger than the given dimension. Can be useful for working on color and mask choices interactively before running through the full resolution image.
Image Tools
The full set of exposure blend tools installed in Filter->Exposure Blend in the menu bar of image windows allow you to align the images, quickly switching among various mask sources and blend radii to compare results. They are:- Masks
-
- Apply First Visible Channel as Layer Mask
- Copy the contents of the first visible channel to the the current layer's mask.
- Save Layer's Mask as Channel
- Save the current layer's mask as a channel for future reference.
- Align Exposures
-
- Bright
- Align the bright exposure, by disabling its masks, and viewing it against the normal exposure in difference mode. Move-link all associated saved masks.
- Dark
- Align the dark exposure, by disabling its masks, and viewing it against the normal exposure in difference mode. Move-link all associated saved masks.
- Off
- Turn off exposure alignment mode, restoring layer visibility, masks, and unlinking the moves.
- Trim Image to Overlap Area
- Trim all images to areas of mutual overlap (after alignment). The trim will be reported in the status bar.
- Blend...
- Main interface to blend (see above).
- Reset Blend Details...
- Set new blend mask options (source, blend radius, edge protection, histogram trimming), similar to the main dialog. This is useful for generating new blurred masks to try, and for quickly switching among the saved masks. The additional option not found in the main dialog is "Regenerate Masks". This causes any saved mask (for a given source image and blend radius) to be re-built, instead of recovered from the cache, as they normally would be. Reuse of cached masks is reported.
Example
Three images taken by bracketing with a Nikon D50 at -2EV, 0EV, and 2EV are shown below.
For large images, it can be very useful to start by working on smaller
copies (e.g. enter 1024 for Scale Largest Image Dimension
to in the main dialog). Experiment with the masks, and then when
you are happy, repeat the steps on the full sized versions. Remember
that a given blur radius has a larger effect on small images (since a
pixel in scaled down images covers a larger portion of the image).
In the image hit m to select the move tool. Double-click
on the tool in the palette, and set it up to Move the current
layer, to ensure you move the bright layer, not the normal layer
beneath. Zoom in to 100% (hit 1). Click and drag the
image into place, or use the arrow keys to move 1 pixel at a time (very
useful for nudging it into alignment). During alignment, the image will
look as at right.
Note that since the exposures are different, in general the alignment
difference images will not be black, but will look like a strangely
colored version of the image itself. Properly aligned images will have
no sharp contrasts (black to white) at edges, but appear flat and dull.
Use vertical and horizontal edges in the image to help guide you. Even
1 pixel offsets will reveal strong contrast changes at sharp edges.
If the images were substantially rotated with respect to each other, you
could gauge the rotation from the difference image and use the Gimp's
rotate tool to attempt a better alignment, but it's better to shoot on a
stable platform to begin with, so that alignment errors are at most a
few 10's of pixels. With practice, aligning the images should take just
a few seconds. Note that you could setup the layers into the proper
differencing mode for alignment yourself, but using the menu options
ensures that any associated cached masks get moved as well.
Repeat this with Exposure Blend->Align Exposures->Dark,
and then use Exposure Blend->Align Exposures->Off to
return to the normal mode.
At this point, you can choose to Exposure Blend->Align
Exposures->Trim Image to Overlap Area to trim the image to the
region where all 3 layers overlap. This can be done at any point.
After adjusting the opacity of the bright layer, the image looks much
less flat, but still has detail in the shadows, as seen in the second
pass version at right.
You can also experiment with the Auto-Trim Mask Histograms
option, which typically brings out more of the dark image (since it was
underexposed, it will often range over small values, like 0-100).
Another useful possibility is using the Normal image as the dark mask
(which is similar to, but not identical to using the dark mask with
trimmed histograms). Both of these methods give more weight to the dark
image.
Note that you can directly see the impact of a given layer on the final
image by toggling the "eye" in the layer dialog (Control-l pulls that
up). You can try changing the blend radius as well: large values will
"soften" edges, and smaller values increase the contrast. If you find
objectionable halos around high contrast edges, try the "edge
protection" (see below). Note that as you create different masks with
different parameters, they are stored for quick reuse as "Channels", as
seen below:
Remember than making regions in a mask brighter assigns that image more
weight in the final blend. Clicking on the Auto button is
the same as using Auto-Trim Mask Histograms in the
exposure-blend dialogs. Feel free to experiment. If you are
ever unhappy with what you end up with, simply use Exposure
Blend->Reset Blend Details... to reset the masks from the stored
cache. You can also use the "dropper tools" in the levels dialog to set
the white and black point. Toggle the Preview button to
see the effect of your modifications. Experiment as well with using the
normal or bright images as the dark mask, since these give it even more
weight.
The main thing to remember is to try not to introduce any sharp edges
into the masks. When you make a selection, feather it using
Select->Feather before tweaking its brightness. Paint the
mask using soft edged brushes or the airbrush, etc. For scenes with a
few small, very bright regions, consider moving the dark layer to the
top, and selectively raising the value of the layer mask there.
Obviously, the sky is the limit with this technique. While
experimenting, it might be useful to save your custom mask so you can
compare it with others (see next section).
To save a given layer's mask as a channel, select the layer, and use
Exposure Blend->Masks->Save Layer's Mask as Channel. The
saved mask will show up first in the list of custom channels (with name
based on the layer and beginning "EB:"). Double click the name to
change it. Give it a good name to remember it by. Note that, unlike
automatically generated cached masks, saved masks are not shifted
along with their source image, so it is a good idea to finalize the
alignment before saving any.
To apply a saved mask from among the channels, make it the first (only)
visible channel in the list (by clicking the eye icon at the left),
switch to the Layers dialog, select the target layer, and choose
Exposure Blend->Masks->Apply First Visible Channel as Layer
Mask. The channel will be copied to the layer's mask, and its
visibility will be turned off.
And a full listing.
Aligning Images
Adjusting Masks
Example: Advanced Techniques
Several advanced techniques require greater familiarity with the Gimp,
but can produce even better results, with far more flexibility.
Fine-Tuning Masks
In many cases, superior results can be obtained by editing the masks
directly, in particular using value thresholds or other color adjustment
tools. A few basic GIMP tricks beforehand: in the layers dialog,
clicking on a layer will highlight it. Clicking on its mask image will
surround it with a white border, which makes it current for editing
operations. Clicking the eyeball at left hides the layer, and
shift-clicking shows only that layer. Alt- (or option-) clicking
the mask toggles showing the actual mask image, and surrounds the mask
icon in the layers dialog with a green border. To show the mask for a
given layer, shift-click the eye icon to make it the only visible layer,
then alt-click the mask. Control-clicking the mask icon disables it,
surrounding it with a red border.
Protect the Edges
The default normal Gaussian smoothing which is used for the masks can
allow the signature of, e.g., a bright window to "leak out" to a
slightly larger region, giving more weight to the underexposed image
than is appropriate there, and leading to dark or bright halos which
appear along any edge of high contrast. To help prevent these halos,
you can use "edge protection", by choosing low, medium, or high
selective smoothing. This is implemented with the "Selective Gaussian"
Gimp filter, and it leaves contrasty edges relatively intact in the
mask. Selective smoothing is much slower than normal Gaussian
smoothing, so you might check for objectionable halos before going that
route. It can also reduce contrast somewhat in areas with smoother
gradations. Since exposure-blend caches any mask you build, you
can quickly switch back and forth between normal and selectively
smoothed masks to see which result is preferable.
Tailoring Masks by Region
Another possibility, once the masks are available, is to selectively
increase or decrease the weight of a given exposure in certain parts of
the image, by selecting difficult regions (e.g. bright windows) and then
using Levels, Curves, or direct painting to brighten or darken the mask
in that region only. See the Gimp
manual for more on its many capable selection tool.
Saving Masks for Reuse, and restoring them
As you work, you might like to save a custom edited mask for later
reuse, perhaps to compare with another version. You can save any mask
alongside the automatically produced default masks as a Channel
(basically just a fancy selection, but for our purposes a convenient
place to store grayscale images). This can be accomplished with the
Exposure Blend->Masks menu.
More Examples
See this video for a video walk-through using exposure-blend, and this article for another description.
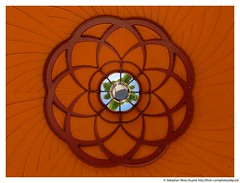
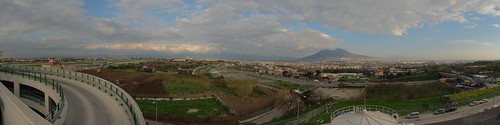
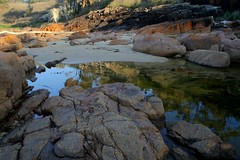
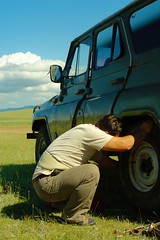
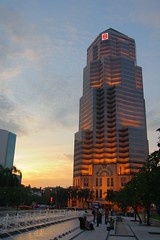
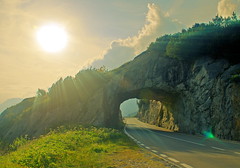
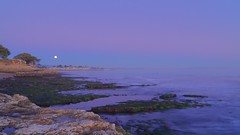
exposure-blend has seen some use on Flickr and elsewhere. A few examples (click for more info):
:max_bytes(150000):strip_icc()/early-autumn-snow-on-the-surrounding-peaks--monica-meadows--kootenay-region--bc--canada-881153770-5b391a49c9e77c001ab0228c.jpg)